Leave Management
One of the main features available in Self Service is Leave Management. You can raise leave requests and have them approved by your Reporting Manager/HR. Below is the leave management process flowchart.
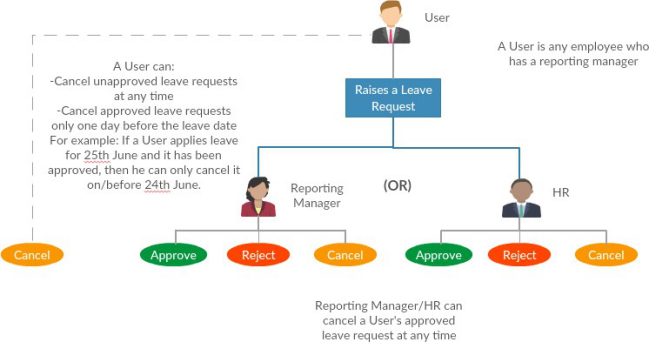
Process Description:
- A User (Any User who has a reporting manager) raises a leave request.
- The User can cancel his leave request unapproved or approved (one day before the leave date.
- Either the Reporting Manager or HR can approve/reject/cancel (at any time) the leave request.

After an approved leave request has been cancelled, the leave(s) are credited back to the user’s leave balance.
How do I configure Leave Management Settings?
The Super Admin/HR can configure the leave settings and allot leaves for employees. The employees can then utilize the leaves allotted to them.
Leave Management Options

To configure leave management options:
- Click HR in the top menu
- Click Leave Management in the left panel
- Click Leave Management Options in the submenu
- Click +Add button in the right side
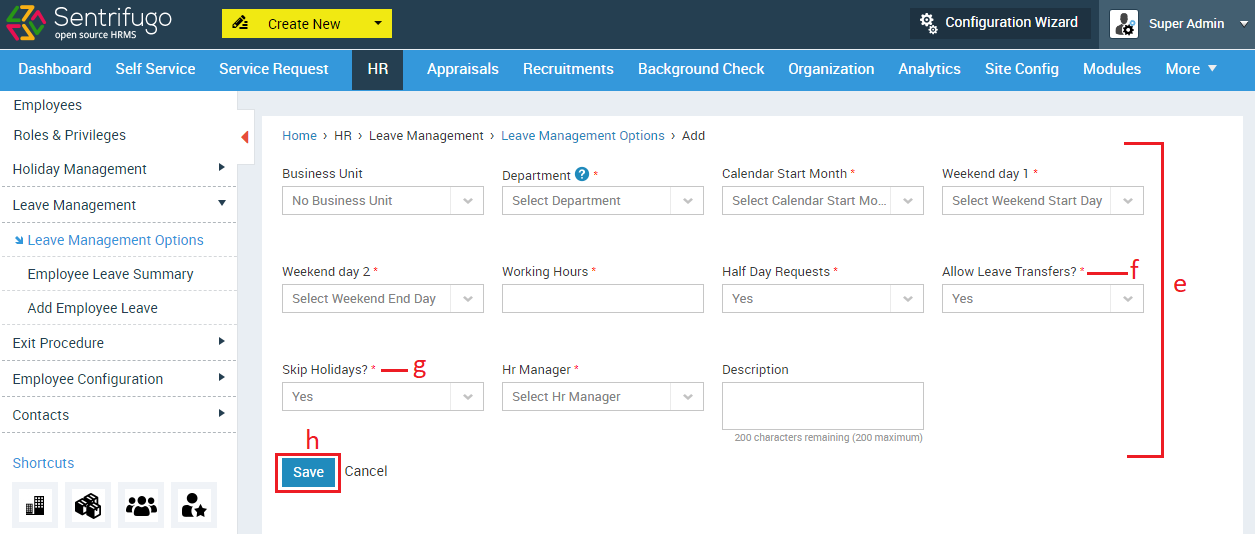
- Fill in the required details
- Allow Leave Transfers: If there are any unused leaves for an employee in the current year, then by using this option they will be carried forward to the next year
- Skip Holidays: If a user applies for a vacation which includes any pre-declared holiday, then by using this option, holiday will be excluded from the vacation days
- Click SAVE button

If each business unit in your organization has different working days and hours, then using this option you can configure the settings.
How do I create Leave Types?
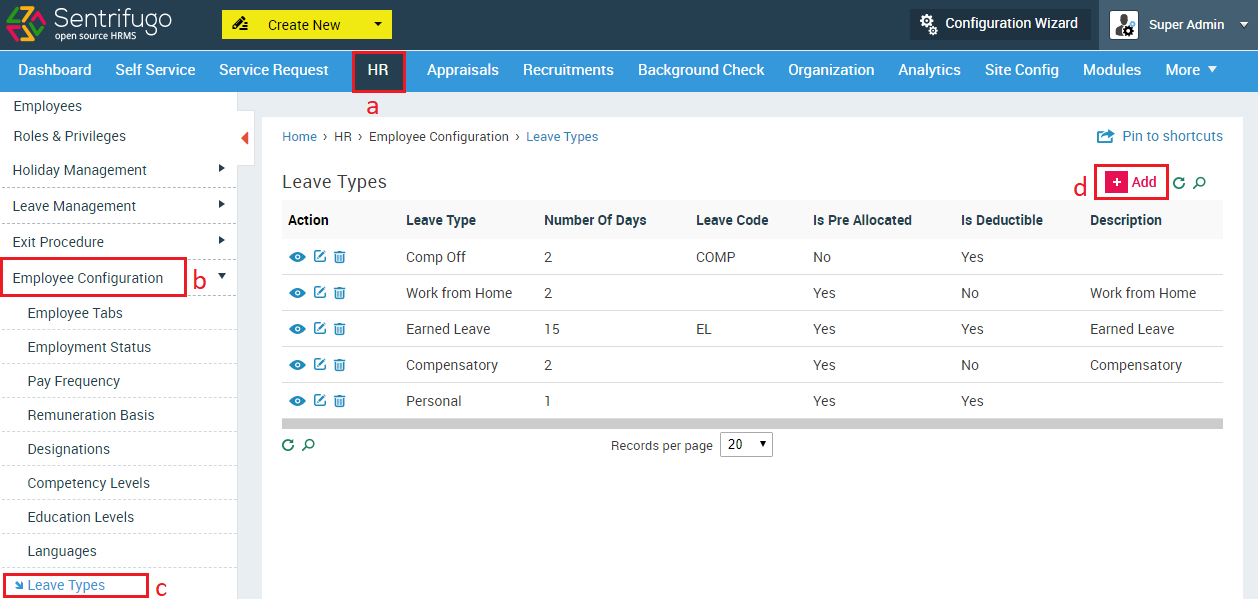
- Click HR in the top menu
- Click Employee Configuration on the left menu panel
- Click Leave Types in the submenu
- Click +Add button on the right side
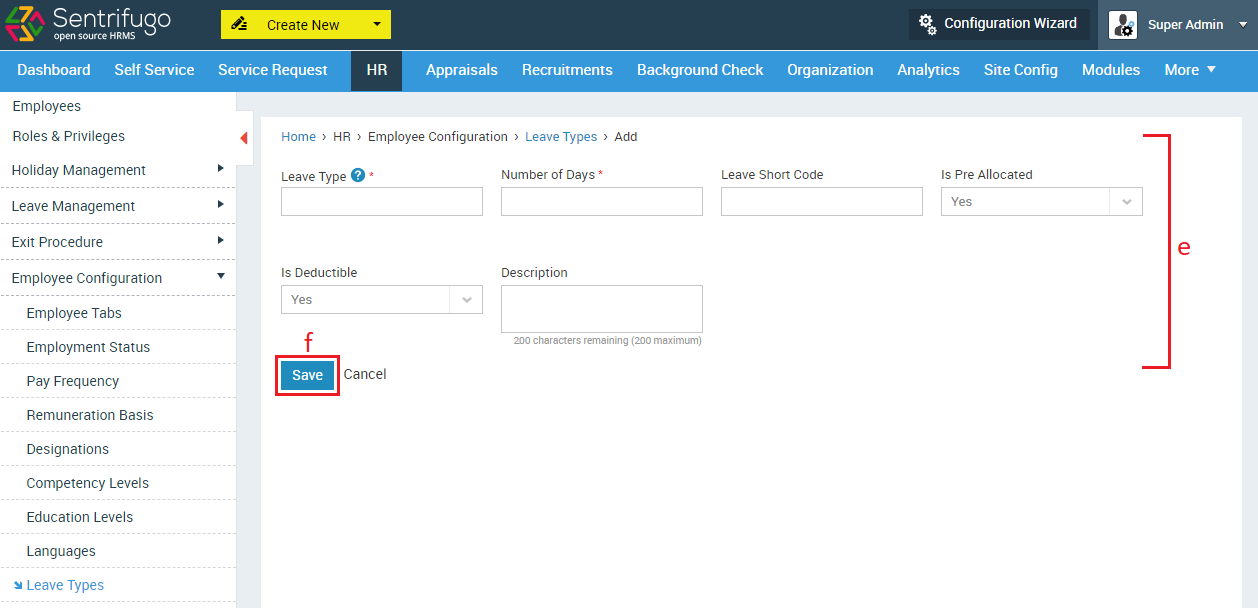
- Fill in the required details
- Click SAVE button to create a new leave type
The number of days assigned to a Leave Type denotes the maximum number of days a User can apply for a leave at one go. It’s not the total leave balance for a leave type.
How do I allocate Leave to Employees?
There are two ways to allocate leaves to employees:
- Import Employees Leaves
- One employee at a time
Import Employees Leaves (in bulk)
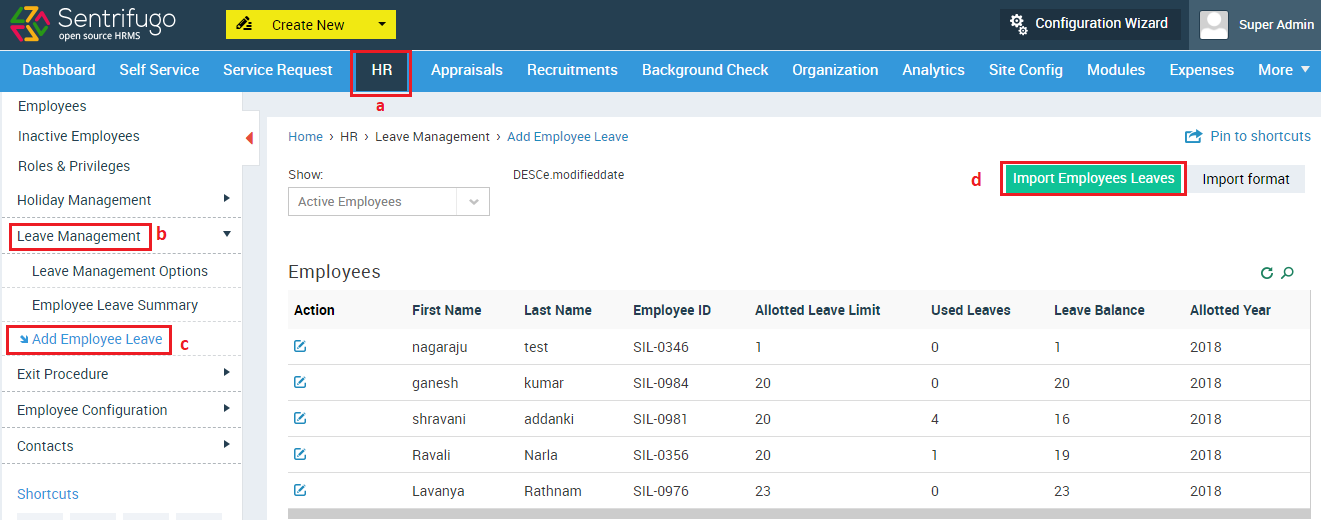
- Click HR in the top menu
- Click Leave Management on the left side panel
- Click Add Employee Leave in the submenu
- Click Import Employees Leaves on the right side
The format to import leaves is available just beside the ‘Import Employees Leaves’ button.
One employee at a time

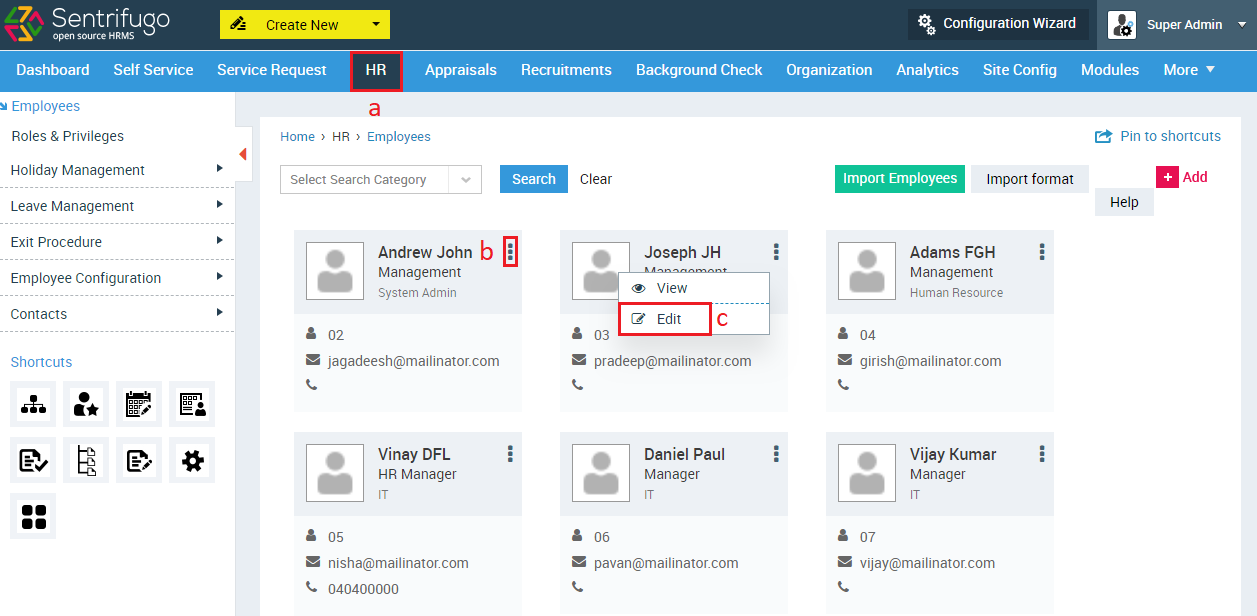
- Click HR in the top menu
- Click More Actions icon
- Click Edit icon
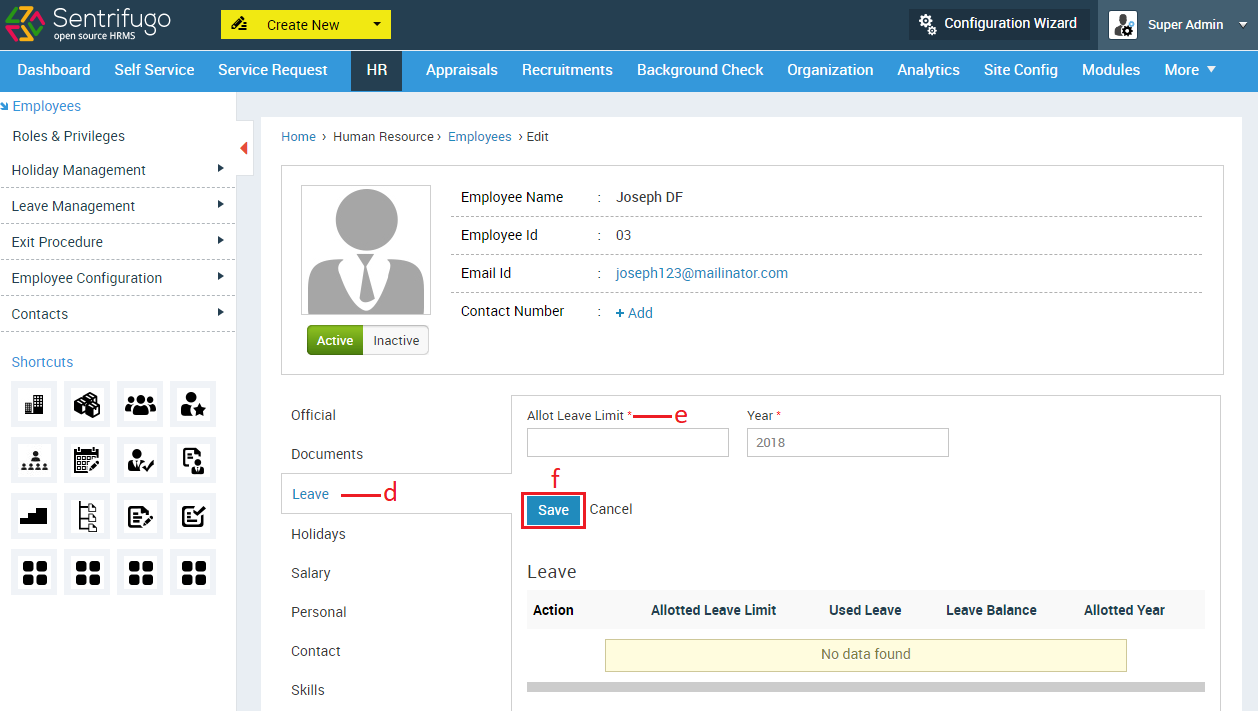
- Click Leaves on the left menu panel (left side of the form)
- Enter the number of days for this employee
- Click SAVE button
You can allocate leaves to employees only for the current year.
How do I deduct Leaves from an Employee?
- Click HR in the top menu
- Click More Actions icon
- Click Edit icon
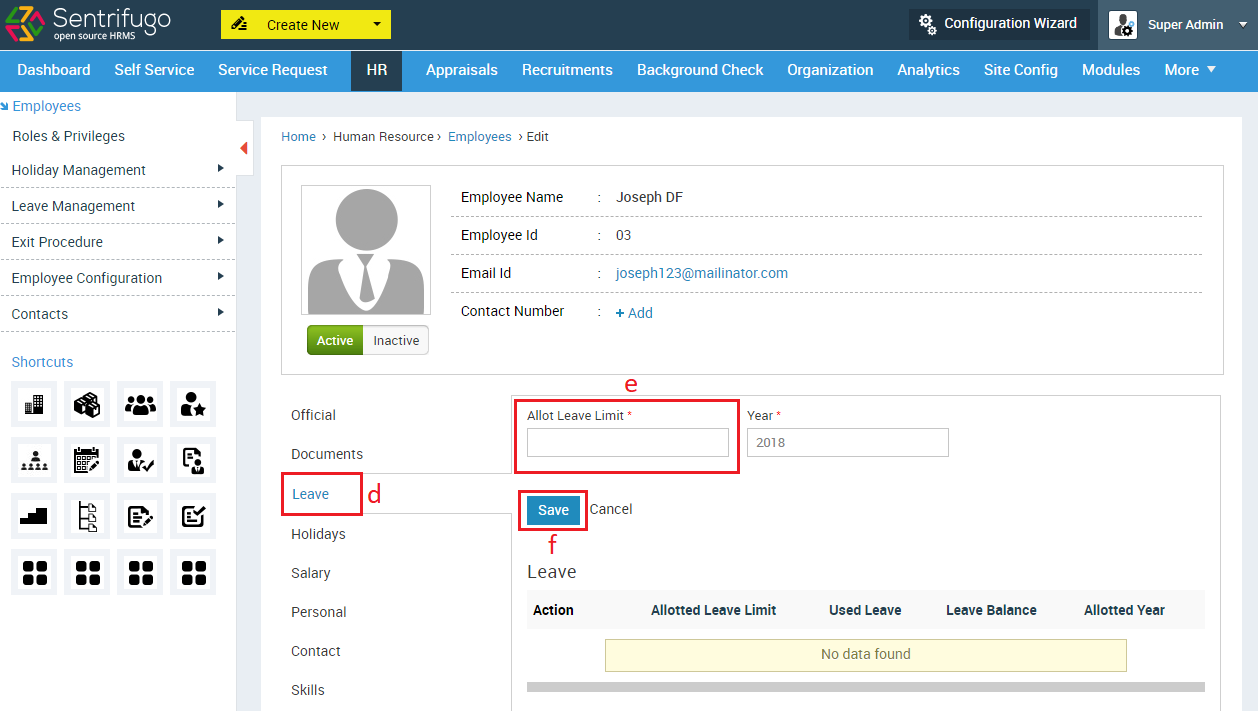
- Click Leaves on the left menu panel (on the left side of the form)
- Enter the number of days with a '-' sign preceding the number for the employee
- Click SAVE button
You can add/remove leaves for an employee, whenever required. (Only for the current year).
How do I create HR Email Group for Leave Management?
Employees and their reporting managers are informed through email notifications about any action (leave request raised, leave request approved etc.) taken during the leave cycle. In order to send email notifications to HR also, you will need to configure an HR email group. If an HR group email is not configured, the following message will be displayed:

- Click Site Config on the top menu
- Click General on the left menu panel
- Click Email Contacts in the submenu
- Click +Add button
- Select the Business Unit
- Select Leave Management Group
- Enter group email id
- Click SAVE button
Every HR email must be unique for a Business Unit. If repeated, you will get an error message: 
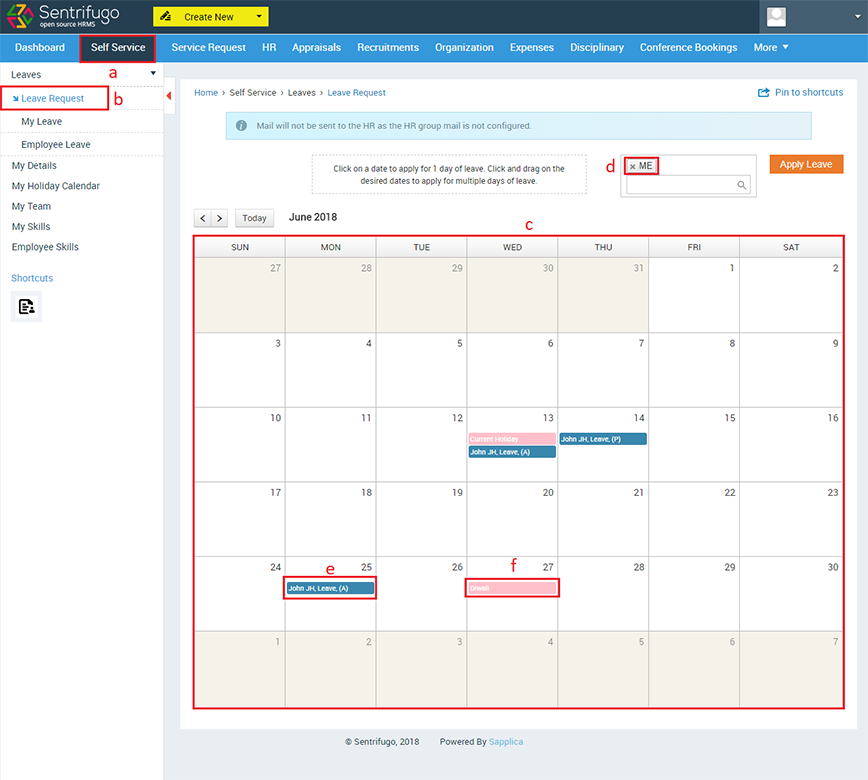
How do I raise a Leave Request?
Before raising a leave request, ensure that you have been allotted leaves for the current year. If you have not been allotted leave an information message will be displayed:

To raise a leave request:
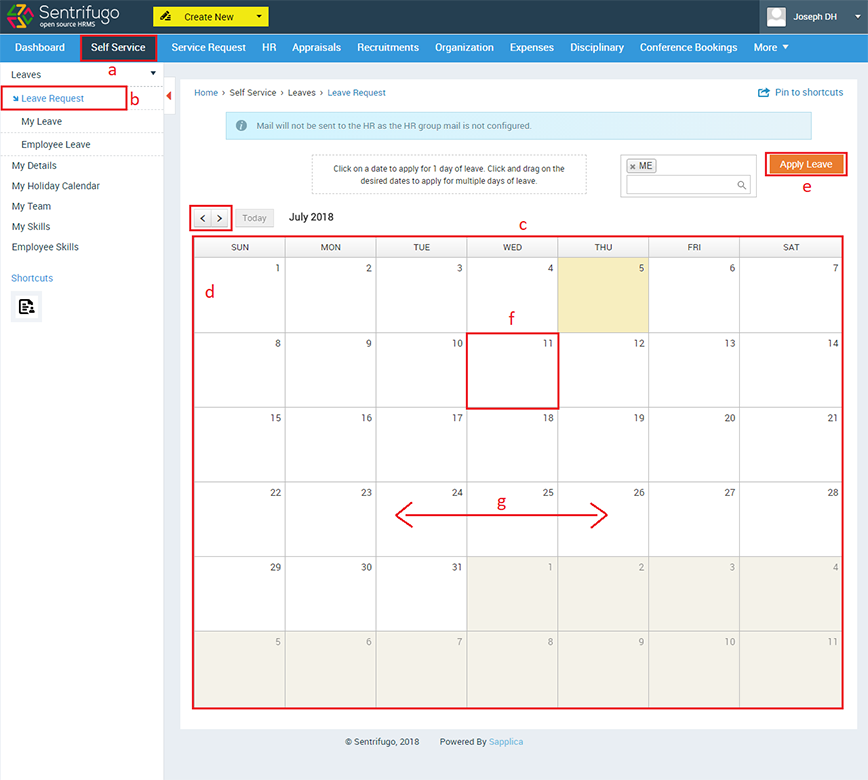
- Click Self Service in the top menu
- Click Leave Request in the submenu
- The current month calendar will be displayed on the right side panel
- Click on previous and next arrow buttons to move to previous or next month
- Click Apply Leave to apply leave for the current day
- Click on any date on the calendar plugin to apply for a day’s leave
- Click and drag on the dates to apply for a long leave (multiple days)
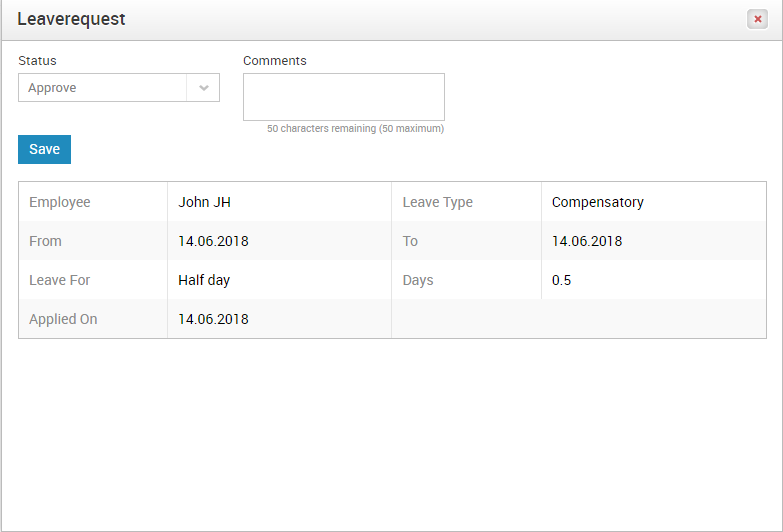
After e/f/g a small window ‘Create: Leave Request’ will open.
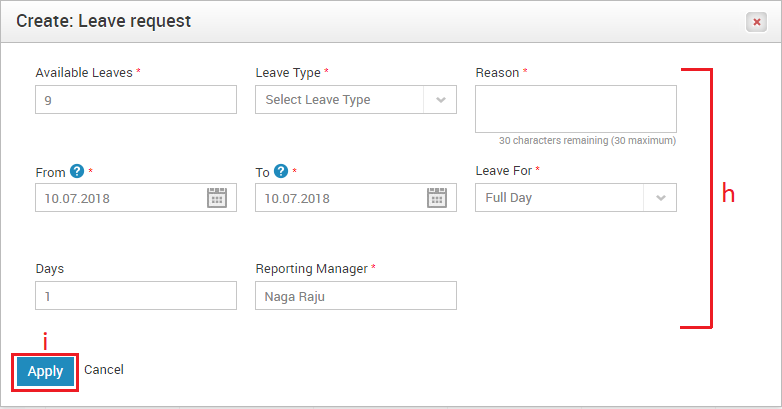
- Enter the required details
- Click Apply button
Leave requests will be displayed in 'Pending Leaves' until an action is performed by the reporting manager
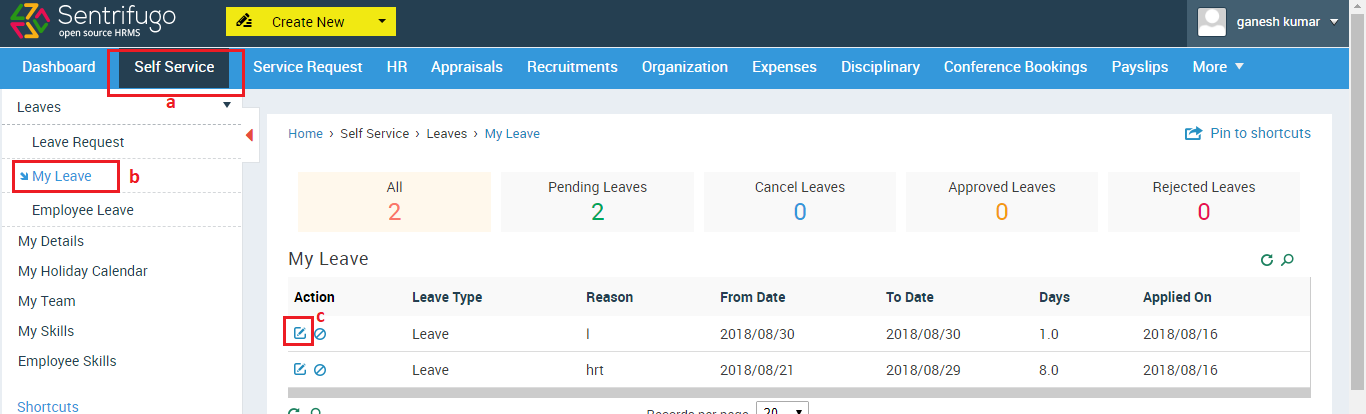
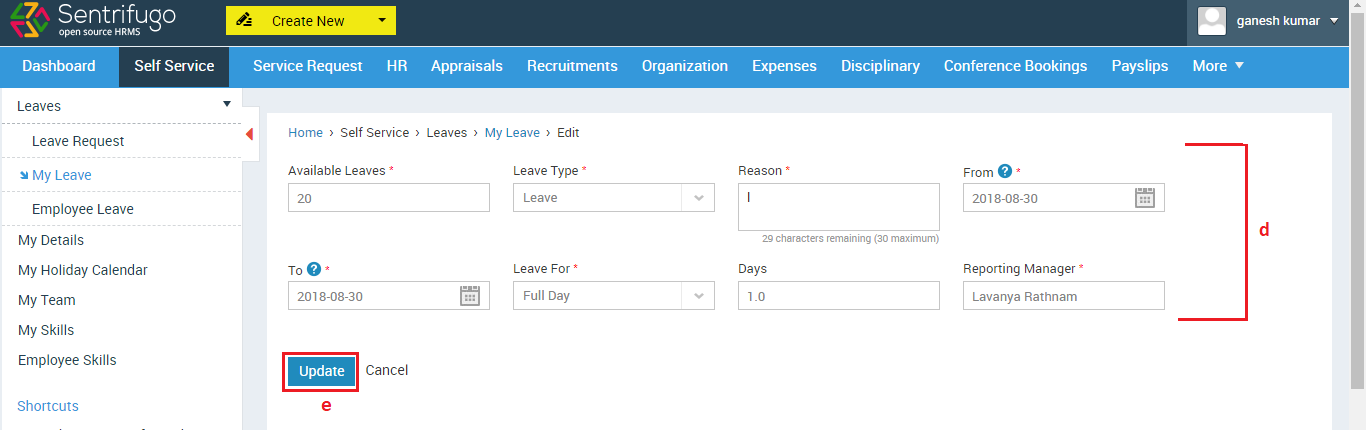
How do I edit my Leave Request?
Employees can edit the leave request till it is approved by their reporting manager.
- Click Self Service in the top menu
- Click My Leave in the submenu
- Click Edit icon
- Update the required fields
- Click Update button
How do I cancel a Leave Request?
Employees can cancel an unapproved leave request at any time. Once a leave request has been approved, they can cancel it only ONE DAY BEFORE the actual leave date. Managers can cancel approved leaves at any time
Employee
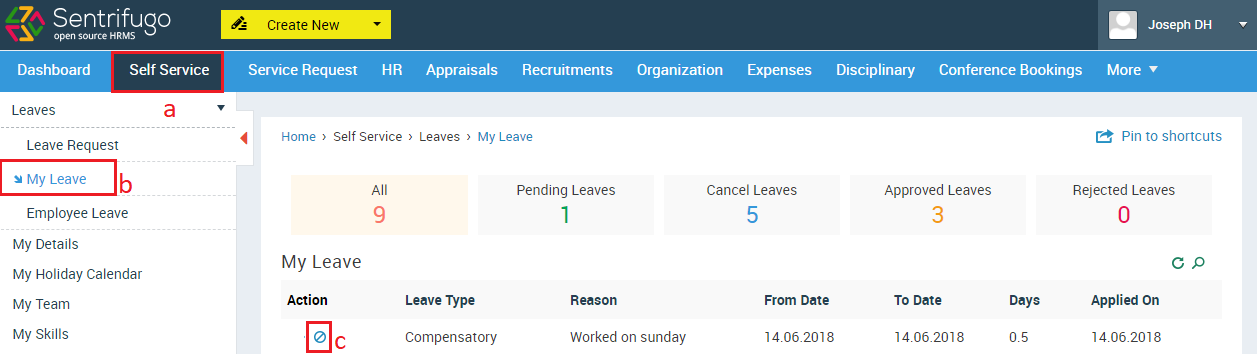
- Click Self Service in the top menu bar
- Click My Leave in the submenu
- Click Cancel icon in the Action column
A confirmation message will be displayed
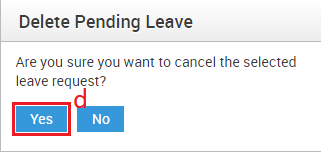
- Click Yes button to cancel the leave
You can view your cancelled leaves in Self Service > Leaves > My Leaves > Cancelled Leaves
Manager

- Click Self Service in the top menu bar
- Click Employee Leave on the left side panel
- Click More Action button in the Action
A small pop up window will open:
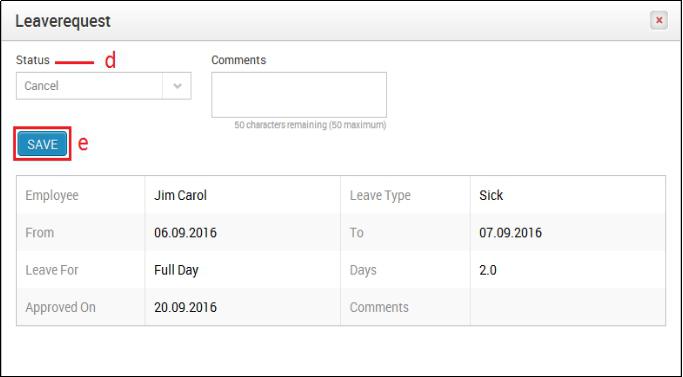
- Select Cancel
- Click SAVE button
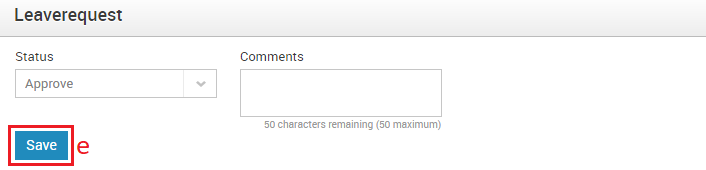
How do I Approve/Reject an Employee’s Leave Request?
The HR and Employees’ reporting managers will have the privilege to approve/reject leave requests.

- Click Self Service in the top menu
- Click Employee Leave in the submenu
- Click More Actions button in the Action column
A small pop up window will open.
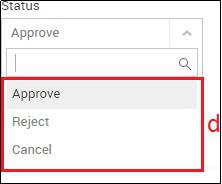
- Select the status
- Click SAVE button to complete the selected action.
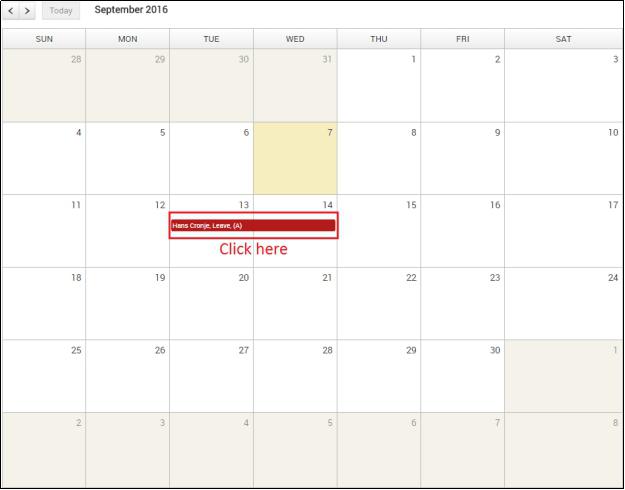
How do I view the Approved Leaves and Leave Requests of all the Employees Reporting to Me?
Reporting Manager can view the approved leaves and leave requests of all the employees reporting to them by using the calendar plugin.

- Click Self Service in the top menu
- Click Leave Request in the submenu
- Select the option ‘Employee reporting to me’
For the day(s) on which employees have taken leave(s) or raised leave request(s), a horizontal bar having the employee’s name on it will be displayed across the dates.
![]()
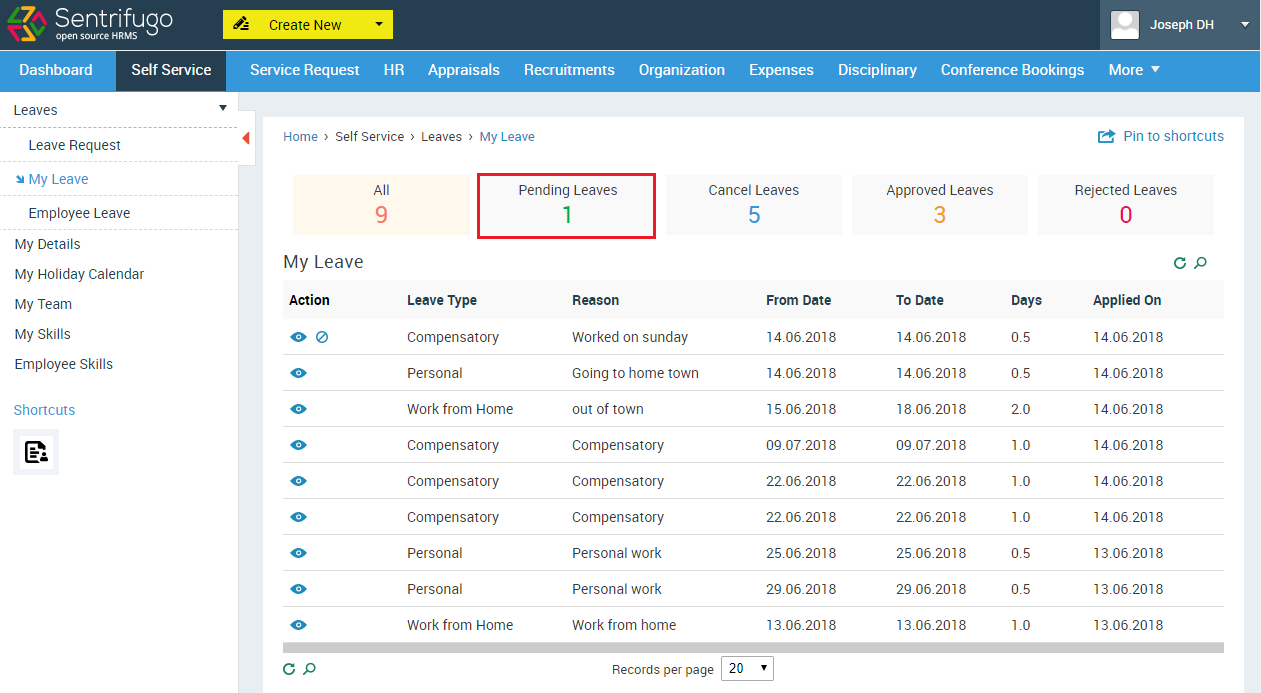
How do I view my own Leave(s)/Leave Request(s)?
- Click Self Service in the top menu
- Click Leave Request in the submenu
- A calendar plugin will be displayed.
- Select the option ‘Me’ (It will be selected by default)
- For the day(s) on which you have taken leave(s)/raised leave request(s), a horizontal bar will displayed across those dates.
- You can also see holidays
Your leaves requests will be categorized in to 5 types:
- Pending Leaves
- Canceled Leaves
- Approved Leaves
- Rejected Leaves
- All
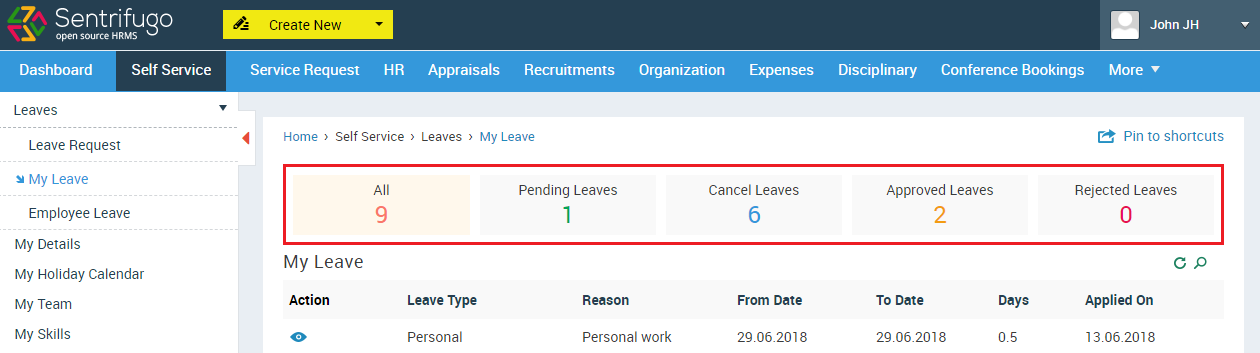
Click on any category to view the leaves accordingly.
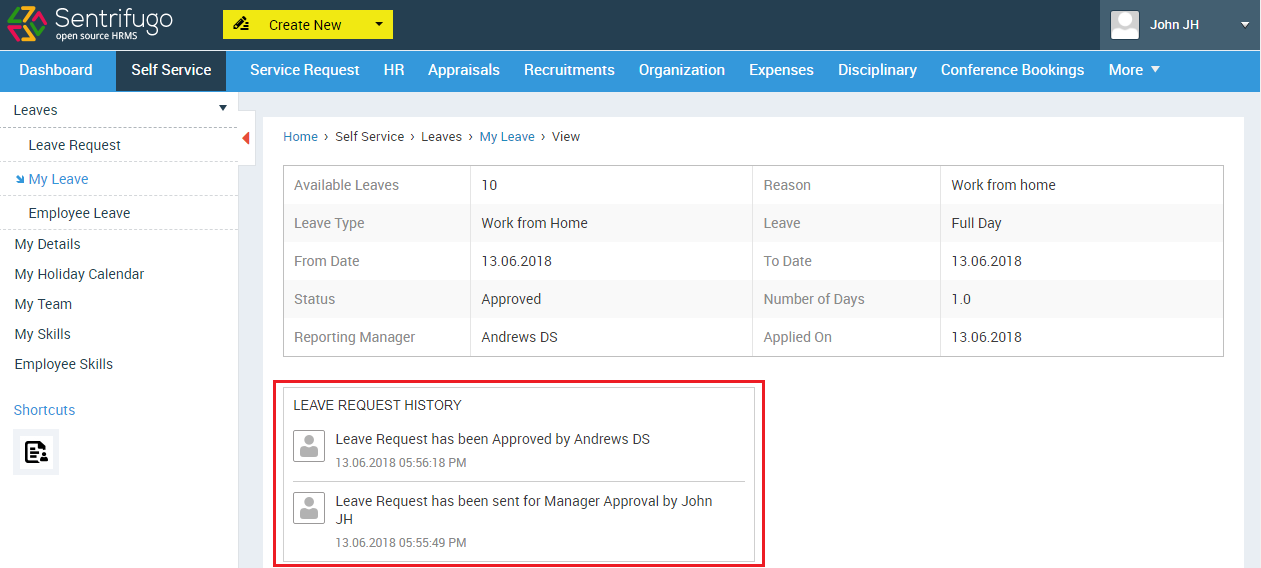
An activity log will be displayed for every action performed by user(s) involved in a Leave Management Cycle. This will provide users more clarity about the status of the process.
How do I create Holiday Groups?
Holiday Groups are useful for organizations having teams located in different countries or which follow different holiday calendars.
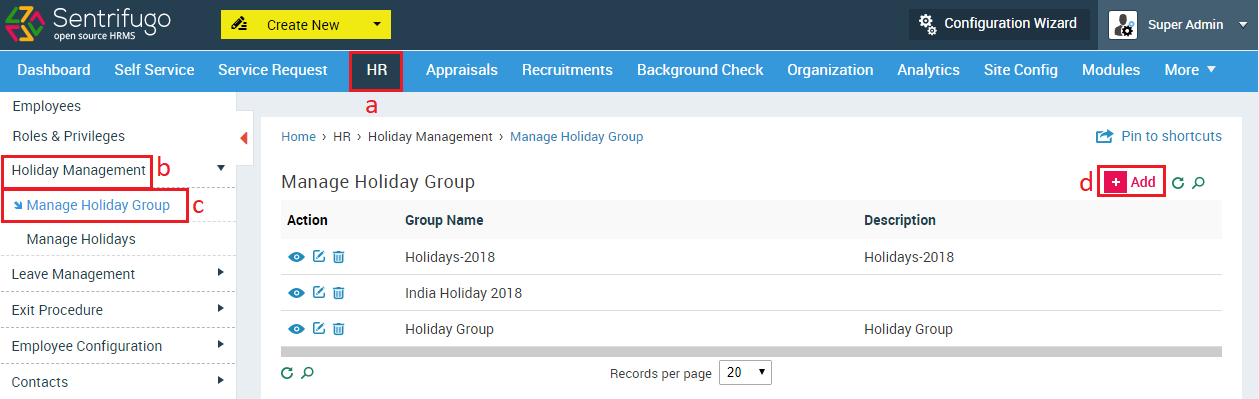
- Click HR in the top menu
- Click Holiday Management on the left menu panel
- Click Manage Holiday Group in the submenu
- Click +Add button
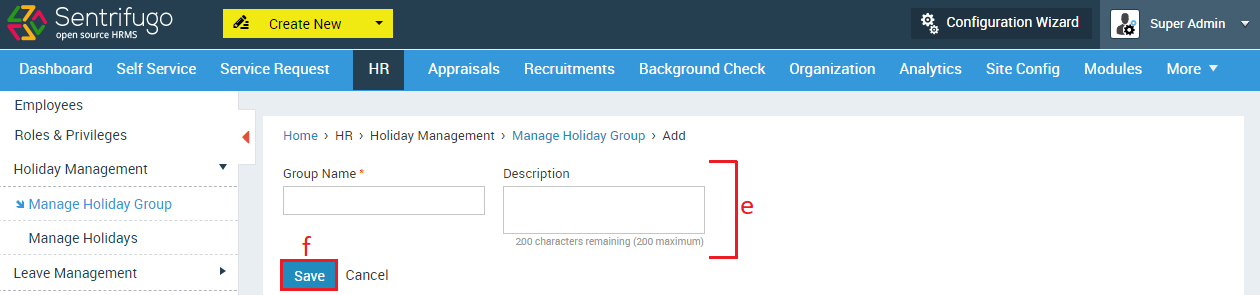
- Enter the required details
- Click SAVE
How do I create Holidays?
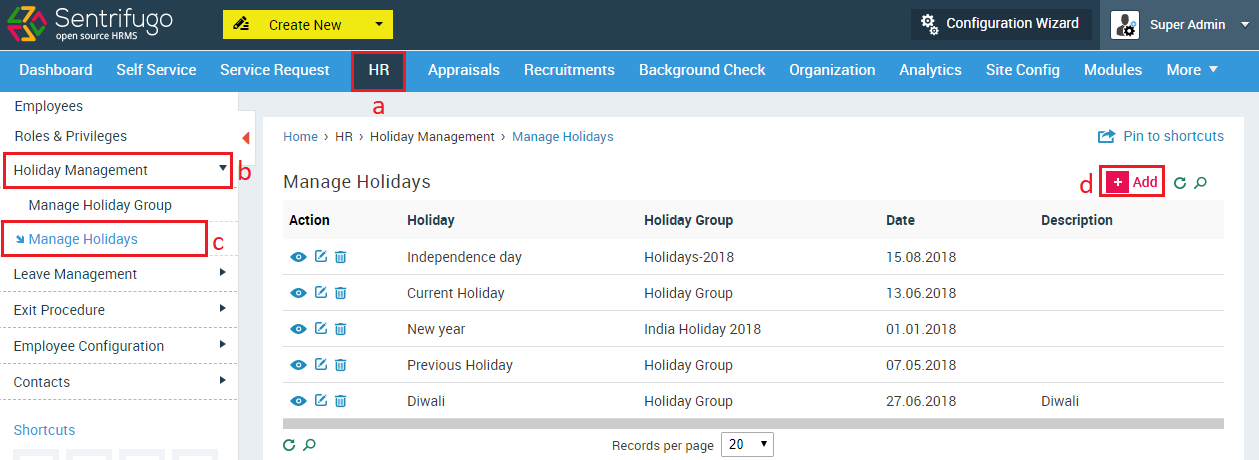
- Click HR in the top menu
- Click Holiday Managementon the left menu panel
- Click Manage Holidays in the submenu
- Click +Add button
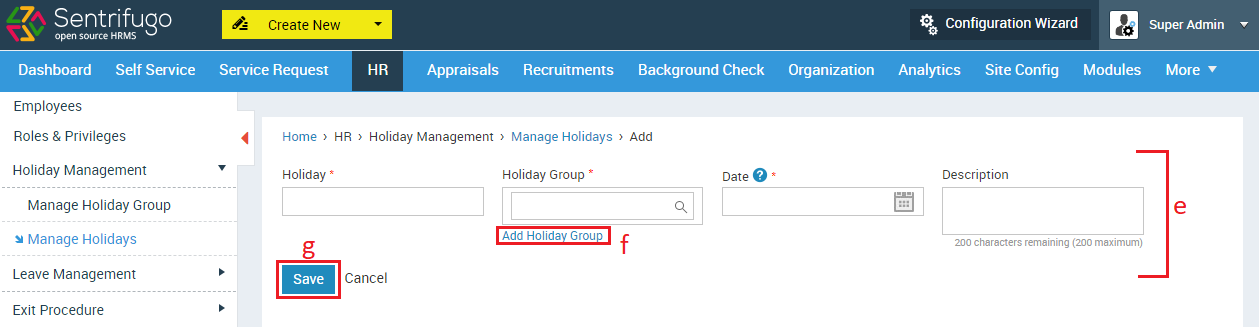
- Enter the required details
- Add a new Holiday Group
- Click SAVE
By providing a Holiday Group name, you will be assigning the Holiday to a Holiday Group.
How do I assign Holidays to Employees?

- Click HR in the top menu
- Click More Actions button in the Action column
- Click Edit icon
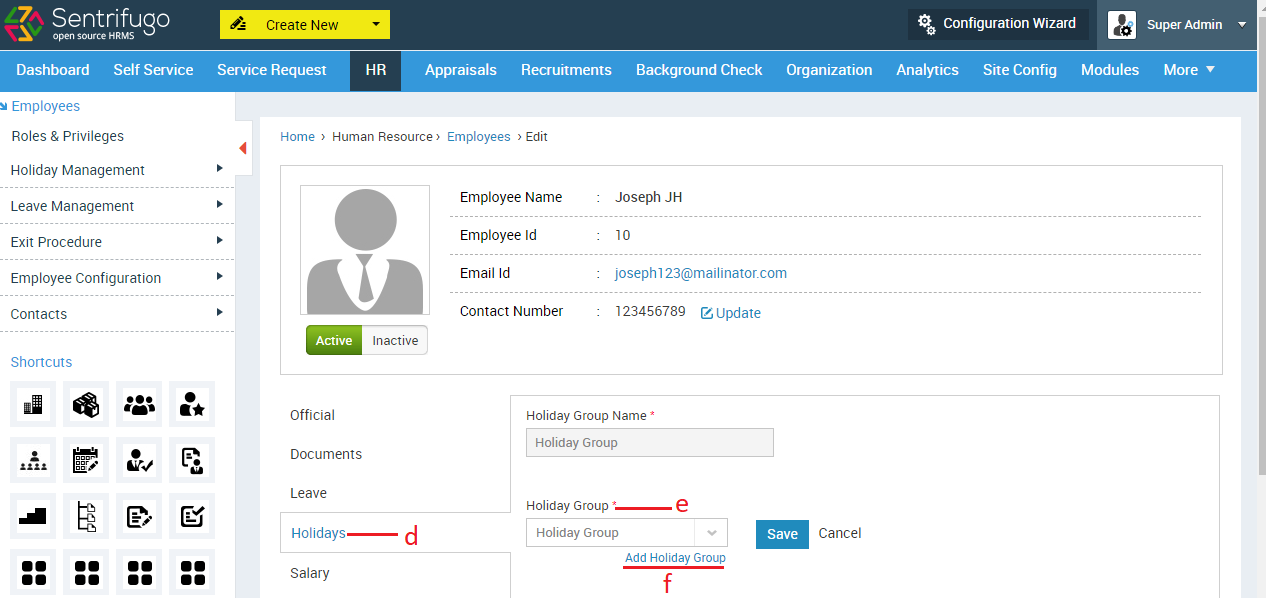
- Click Holidays on the left menu panel (Form’s left side)
- Select a Holiday Group from the drop down option
- Create a new Holiday Group
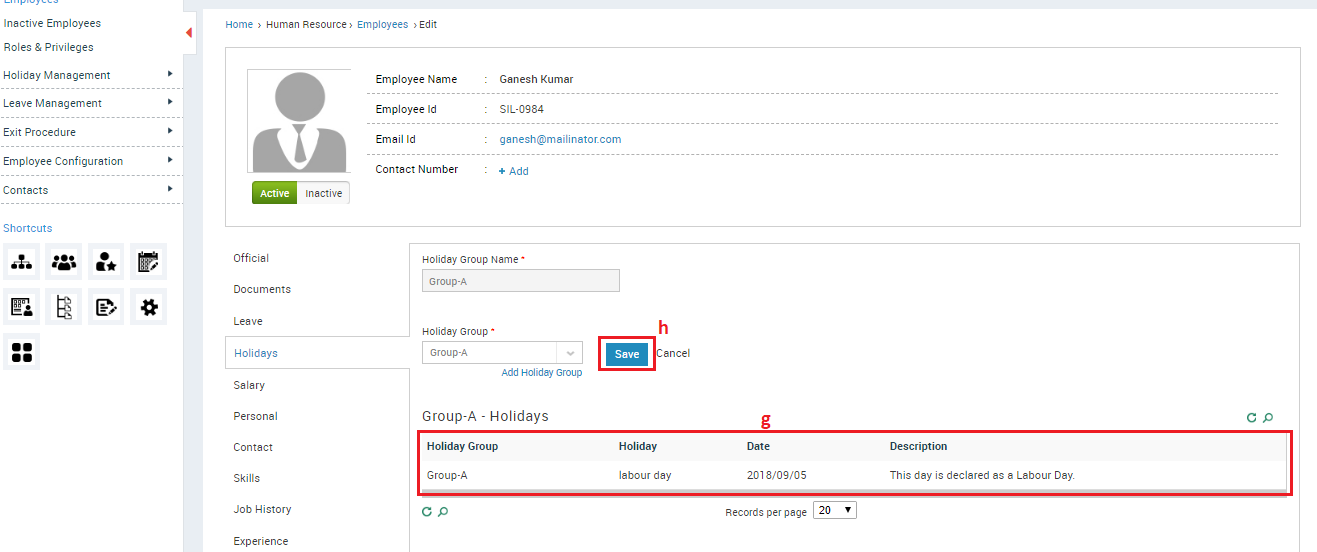
- A grid containing the holidays in the holiday group will be displayed
- Click SAVE
The employee will now be able to see holidays on the calendar plugin.